
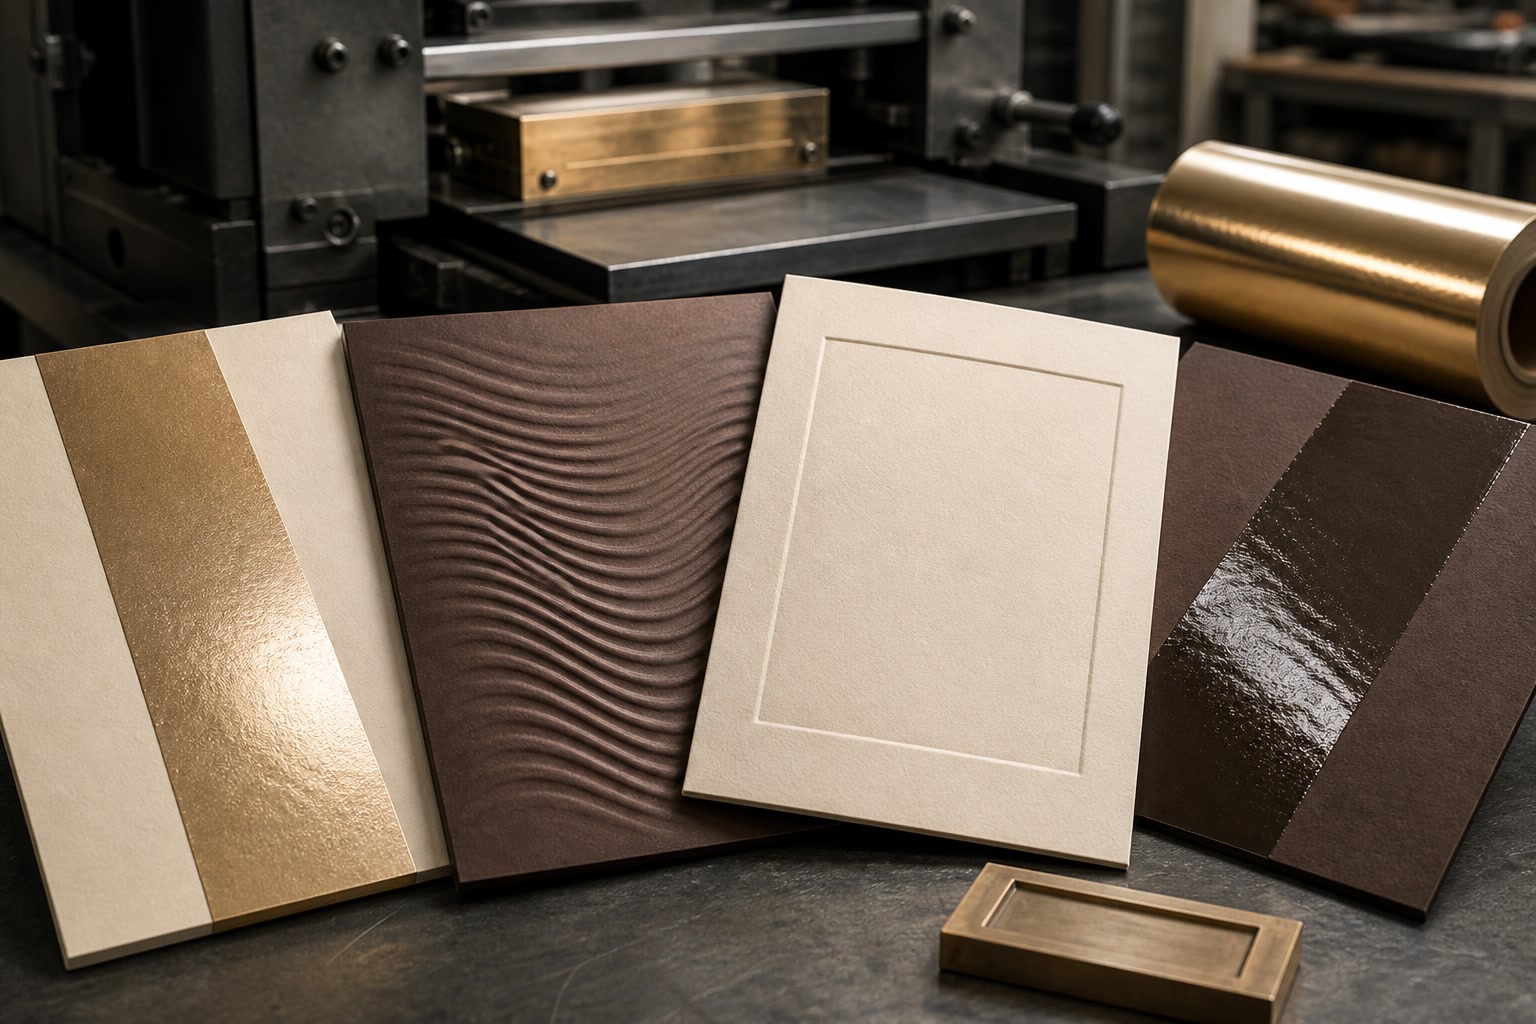
Choosing between foil, embossing, debossing and spot UV comes down to the effect your packaging needs to achieve. Foil creates a reflective or metallic highlight; embossing raises an area above the surface; debossing presses it below the surface; and spot UV adds a smooth gloss contrast to selected printed areas.
These finishes can all make a box, label or gift pack feel more considered, but they do not behave in the same way. The best choice depends on the artwork, board or paper, coating, viewing conditions and how much of the design should stand out. In many cases, one precisely placed finish looks more premium than several competing effects.
| Finish | Main visual effect | Tactile effect | Best suited to | Key consideration |
|---|---|---|---|---|
| Foil stamping | Metallic, pearlescent or coloured reflective detail | Usually smooth, sometimes lightly textured | Logos, borders, fine decorative details and short messages | Fine artwork and large solid areas need careful assessment |
| Embossing | Shadows and highlights created by a raised form | Clearly raised | Logos, monograms, seals and simple patterns | Works best with sufficient board strength and uncomplicated shapes |
| Debossing | Recessed detail with subtle shadowing | Pressed-in impression | Minimal branding, luxury stationery-style packs and textured papers | Can be understated on dark or highly textured materials |
| Spot UV | Localised gloss, often visible as light moves across the pack | Smooth and slightly raised depending on application | Patterns, product imagery, lettering and tonal graphics | Requires contrast with the surrounding surface to be noticeable |
Compare the visual and tactile result
The most practical foil embossing spot UV comparison starts with how customers will see and handle the finished item. A finish may look striking under bright showroom lighting yet appear restrained in normal home, retail or delivery conditions. Consider the intended viewing distance and whether the pack will be handled before purchase.
Foil stamping: light-catching and high contrast
Foil stamping transfers a coloured or metallic foil to selected parts of the design using heat, pressure and a die. Gold and silver are familiar choices, but foil is also available in many non-metallic, holographic, pearlescent and pigmented appearances. The result is usually crisp and reflective rather than simply shiny.
Foil is particularly effective when used to frame a logo, illustrate a fine motif or give a brand name immediate prominence. It is often easier to notice than blind embossing, especially on a busy shelf or in product photography.
However, foil does not automatically feel raised. A standard foil application is generally smooth to the touch. Combining it with embossing can create a raised metallic feature, often called foil embossing, but this needs different tooling and closer design planning than foil alone.
Embossing: dimensional and expressive
Embossing pushes the paper or board upwards to create a raised image, letter or pattern. The visual impact comes from light and shadow as much as colour. On plain, uncoated stock, embossing can feel particularly tactile and refined because the material itself becomes part of the design.
A blind emboss uses no ink or foil. It is a good option for understated identity systems, particularly where a pack uses a restrained palette or a natural paper finish. An embossed logo can be more memorable in the hand than a printed one, but it may not be immediately obvious in flat photography.
Embossing works best for bold shapes, reasonably open lettering and details that are not crowded together. Very narrow lines, tiny counters inside letters and densely packed patterns can lose definition.
Debossing: recessed and deliberately subtle
Debossing presses an image into the substrate, leaving a recessed impression. It is often chosen for a quieter, craft-led or luxury effect, especially on sturdy uncoated paper, leather-like materials or thicker board.
Because a deboss sits below the surface, it can look elegant without adding a visually dominant element. It is useful when the aim is texture and depth rather than high contrast. A debossed mark may be paired with print or foil, but it also works well alone where the material quality should take centre stage.
The trade-off is visibility. A blind deboss can be difficult to see at certain angles, on heavily textured sheets or when the board colour is very dark. It should be specified for touch and close inspection, not as the only way to communicate essential product information.
Spot UV: controlled gloss rather than metallic shine
Spot UV is a clear gloss coating applied only to selected parts of the printed surface. It is most noticeable against a matt or soft-touch laminated background, where the difference between low-gloss and high-gloss surfaces creates a clear contrast.
It is popular for highlighting a wordmark, a product outline, a repeating pattern or image details such as water, glass or botanical leaves. Unlike foil, spot UV has no metallic reflectivity; unlike embossing, it primarily relies on gloss rather than physical depth.
On a gloss-laminated pack, ordinary spot UV can be much less distinct because the background is already reflective. On a matt laminate, the contrast tends to be more apparent. Raised spot UV is a separate process that can add a more noticeable tactile profile, but its practical limits should be confirmed with the printer for the selected artwork and substrate.
Match each finish to suitable artwork
Finishing should support the hierarchy of the design. Start by deciding what people need to notice first: the brand, product name, variant, illustration or a decorative feature. Reserve the finish for that priority rather than applying it to every possible element.
| Artwork feature | Most suitable finish | Why |
|---|---|---|
| Bold logo or monogram | Embossing, foil, or foil embossing | Gives a compact brand element presence and definition |
| Fine decorative linework | Foil or spot UV | Can create detailed contrast without distorting the board |
| Large tonal pattern | Spot UV | Adds visual movement while retaining the underlying print |
| Minimal unprinted mark | Blind embossing or debossing | Lets texture convey the identity |
| Short premium message | Foil | Creates a focal point with strong shelf visibility |
| Thick icon or seal | Embossing or debossing | Simple forms translate well into physical relief |
| Product image highlights | Spot UV | Selectively enhances printed details without covering the whole image |
Prepare artwork as separate finishing layers
Each finish should be supplied as its own named layer or spot colour in the production artwork. Do not rely on a visual mock-up alone. The technical file needs to state exactly where foil, embossing, debossing or spot UV will be applied.
Use solid vector shapes where possible. Avoid transparency, gradients and unintended overprints in finishing artwork unless the production team has specifically confirmed a method that supports them. A finishing layer should not contain small accidental gaps, duplicate paths or faint raster pixels that could create unwanted marks.
For text, use a suitably robust font size and weight for the chosen process. There is no universal minimum because results vary with the die, substrate, coating and letterform. Instead of assuming a small serif font will reproduce cleanly, submit the actual artwork for a pre-production review and inspect a physical sample.
Keep important information in print, not in a subtle finish
Product names, legal wording, ingredients, directions, barcodes and variant details should remain clearly printed. Blind embossing, debossing and clear spot UV are design enhancements, not dependable methods for communicating vital information in every light condition.
This matters especially for e-commerce. Product images may not show a tactile finish accurately, while reflections can obscure foil or spot UV. Use the finish to enrich the physical unboxing experience, but ensure the core pack information is legible without it.
Review paper and lamination interaction
The substrate has as much influence on the result as the finish itself. The same die and artwork can look markedly different on a soft uncoated sheet, a rigid folding boxboard or a laminated printed carton.
Uncoated papers and boards
Uncoated materials are often excellent for blind embossing and debossing because the surface has natural texture and the relief can be felt clearly. They suit understated, tactile packaging, though fibre texture may soften extremely fine detail.
Foil can also work well on uncoated stock, but the result may have a less mirror-like appearance than it would on a very smooth surface. That can be desirable for an artisanal or natural look. Spot UV may be less uniform on porous or textured materials, so it needs testing if a highly even gloss is important.
Coated and smooth boards
Smooth coated stocks generally support crisp printed detail, even foil coverage and a more consistent spot UV surface. Their uniform finish can make fine decoration easier to reproduce, although this does not remove the need for suitable line weights and spacing.
Embossing on coated board can be attractive, but the compression may alter how the surface reflects light. The effect needs to be assessed with the actual print and coating, particularly where a dark solid colour surrounds the embossed area.
Matt, gloss and soft-touch lamination
Lamination changes both appearance and the way subsequent finishes adhere or register.
- Matt lamination is a common partner for spot UV because the gloss contrast is easy to see.
- Soft-touch lamination can provide a velvety background that makes foil and selected gloss details feel more deliberate. It can also show handling marks, so test the pack under expected use.
- Gloss lamination supports a polished overall appearance, but ordinary spot UV can become visually subdued against it.
- Foil over lamination can be effective, but compatibility depends on the film and foil system used.
- Embossing or debossing after lamination can change the surface appearance at the relief edges. Discuss the intended depth and shape before committing to artwork.
For custom cartons and printed packaging boxes, ask for the finishing recommendation to be based on the actual board, printed colours and laminate rather than a generic stock description.
Understand tooling, registration and coverage
Foil, embossing and debossing require physical tooling, typically a purpose-made die or matched set of dies. Spot UV usually requires its own screen or plate, depending on the process. These setup requirements influence lead time, cost structure and how easily the design can be changed later.
Tooling is specific to the approved design
Any meaningful change to the finished shape, such as moving a logo, revising letterforms or changing the size of a foil border, may require new or revised tooling. Freeze the finishing artwork before authorising tooling wherever possible.
Embossing requires a male and female form that work together to shape the material. The board thickness, desired depth and artwork detail all affect what can be achieved. Deeper is not always better: excessive pressure may weaken the board, create distortion on the reverse side or interfere with folds and glued areas.
Registration must allow for real production movement
Registration is the alignment of foil, spot UV or a raised/debossed shape with the printed artwork. On screen, a foil outline may appear to sit exactly around a printed letter. In production, paper movement, board tolerances and process variation mean that ultra-tight borders can appear uneven.
To reduce visible registration risk:
- Avoid extremely thin foil keylines around printed objects.
- Do not place finishes too close to cut lines, folds, scores or glue flaps without approval.
- Use a deliberate overlap where foil or spot UV sits over print, rather than relying on an exact edge-to-edge join.
- Leave adequate clear space between adjacent fine details.
- Design embossed and debossed features with enough room from reverse-side graphics, creases and structural panels.
A slight intentional offset can sometimes look better than an attempted hairline-perfect alignment. The right approach depends on whether the finish is meant to overlay print, sit independently or create an edge.
Coverage affects consistency and practicality
Large foil blocks can look dramatic, but broad solid areas may show surface variation, particularly on textured materials or designs with awkward shapes. Fine foil lines can also present challenges if they are too thin or too closely spaced.
Spot UV coverage should be selected for contrast, not simply quantity. Covering most of a matt pack in spot UV may reduce the design to a generally glossy surface, weakening the selected-highlight effect. Large coated areas may also be more susceptible to visual scuffing or fingerprints depending on the substrate and handling environment.
Embossing and debossing are strongest when used as focused elements. Extensive relief patterns can affect how a carton folds, stacks or sits flat. If the packaging will be tightly packed for fulfilment, check that the finish will not be compressed or rubbed during packing and transit.
Combine finishes without visual clutter
Foil, embossing, debossing and spot UV can be combined successfully, but each should have a distinct job. The best multi-finish designs use contrast deliberately: metallic light, physical depth and selective gloss should not all compete for the same visual priority.
Combinations that often work well
- Foil plus embossing: A raised foil logo or emblem creates a strong premium focal point. Keep the shape simple enough to preserve both clean foil transfer and defined relief.
- Matt lamination plus spot UV: A classic contrast for product names, patterns or graphic silhouettes. Use spot UV sparingly so the matt surface remains visible.
- Blind embossing plus foil: Emboss the main brand mark and use foil for a secondary detail, such as a border or product variant. This creates hierarchy rather than duplication.
- Debossing plus uncoated paper: A restrained choice for gift packaging where texture and material are more important than high shine.
- Foil plus spot UV: Foil can identify the primary brand element, while spot UV adds a low-colour pattern in the background. Ensure the two effects do not overlap in a way that makes the message harder to read.
Common combination mistakes
The most frequent issue is applying every finish to the same logo. A foil logo, raised spot UV, embossing and a printed shadow may create an indistinct, overworked mark rather than a more luxurious one.
Other avoidable problems include:
- Using reflective foil and spot UV on a design that already has busy glossy imagery.
- Embossing text that is too small to retain clean letter shapes.
- Specifying clear spot UV on an already glossy background and expecting strong contrast.
- Placing extensive raised or recessed effects across a fold, score or closure area.
- Using foil as a substitute for adequate contrast in printed product information.
- Adding a finish only after the structural design is complete, without checking reverse-side effects or panel alignment.
For premium gift packaging, it is often better to choose one hero finish and one supporting finish at most. This maintains a clear focal point and can simplify quality assessment.
Approve samples on the chosen substrate
A digital render cannot reliably show the reflectivity of foil, the depth of embossing or debossing, or the gloss contrast of spot UV. Approval should be based on a physical sample produced on the proposed substrate and, ideally, with the intended print colours and laminate.
Check the sample in more than one condition: direct light, indirect daylight, retail-style lighting and normal handling. Look at it from different angles and inspect both the outside and reverse side of the board.
Use this approval checklist:
- Visual hierarchy: Does the finished feature make the intended logo, product name or pattern stand out?
- Legibility: Are all printed words and fine details still clear around the finish?
- Coverage: Is foil transfer even enough for the intended appearance? Is spot UV visibly distinct from the background?
- Detail: Are small shapes, corners, line ends and letter counters clean?
- Registration: Is the finish positioned acceptably relative to print, folds, cuts and other design elements?
- Tactile result: Is the emboss or deboss depth noticeable without damaging the reverse side or affecting construction?
- Handling: Does the chosen laminate and finish show fingerprints, scuffs or rub marks at an acceptable level for the product?
- Assembly: Do folds, closures, glued areas and stacking remain practical after finishing?
If the packaging has multiple variants, inspect a representative sample for each key colourway. Foil and gloss effects can appear different against pale, dark, saturated and heavily printed backgrounds.
Which finish should you choose?
Choose foil when the priority is reflective impact, a premium accent or fast visual recognition. Choose embossing when the physical feel of a raised logo or motif matters. Choose debossing when the desired look is quiet, tactile and material-led. Choose spot UV when a design needs selective gloss contrast, especially over a matt surface.
For many brand owners, the most reliable route is:
- use foil for a visible hero element;
- use embossing or debossing for a tactile brand detail;
- use spot UV for secondary patterns or image highlights;
- test each choice on the actual board before final approval.
XGolden Print can help translate an approved packaging concept into production-ready custom box or gift-packaging artwork. Before requesting a quotation or sample, prepare the dieline, print artwork, finishing layers, preferred substrate, expected order quantity and any non-negotiable visual details.
