
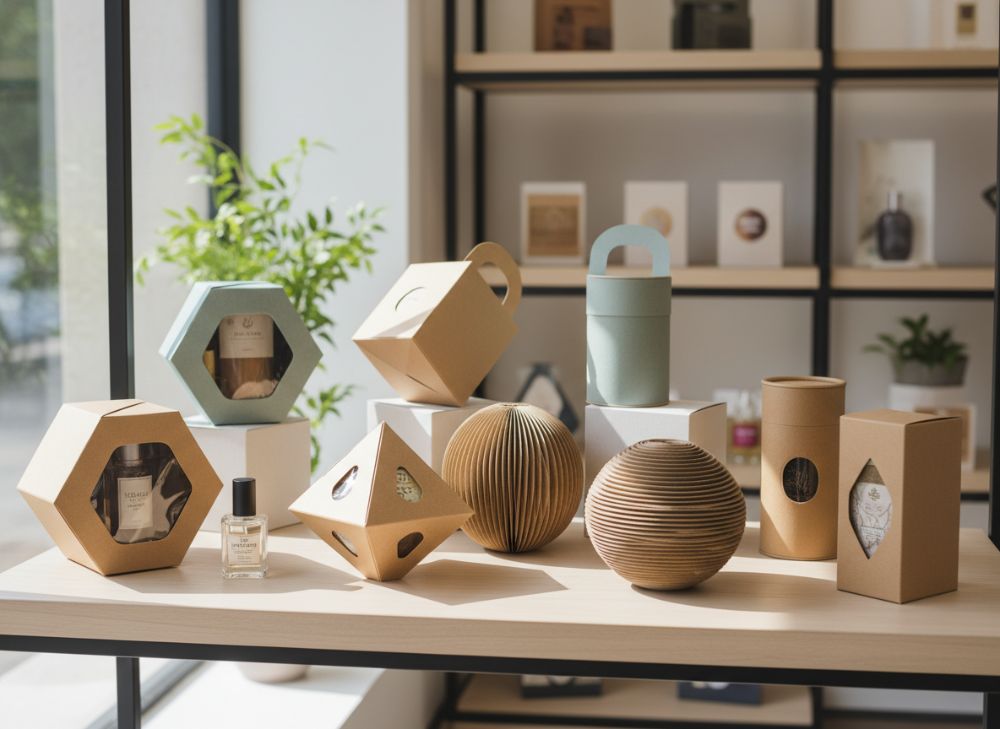
Creative paper box design can make a product easier to notice, understand and enjoy before it is even used. The most effective ideas combine a clear brand message with practical protection, straightforward opening and a format that suits the product’s route to shelf or customer.
These 10 creative paper box ideas to elevate your product presentation are not all right for every item. Start with the product’s size, fragility, retail setting and packing process, then use design features that genuinely add value rather than decoration alone.
| Paper box idea | Best suited to | Key consideration |
|---|---|---|
| 1. Distinctive structural shape | Gifts, premium lines, small accessories | Avoid forms that make storage or packing difficult |
| 2. Die-cut handle | Portable gift sets and takeaway-style packs | Reinforce the handle area where needed |
| 3. Matte finish | Refined, understated branding | Can show scuffs on some darker colours |
| 4. Gloss accents | Bold graphics and vibrant packs | Use selectively to retain readability |
| 5. Soft-touch or tactile stock | Premium presentation boxes | Confirm durability for the intended handling |
| 6. Die-cut window | Products where colour or form sells | Protect the exposed area during transit |
| 7. Interior insert | Fragile, multi-part or high-value products | Match the insert to the real product dimensions |
| 8. Layered reveal | Gift packaging and launch packs | Keep opening intuitive |
| 9. Colour-led product range | Collections with variants or flavours | Maintain a consistent brand hierarchy |
| 10. Reusable box format | Keepsakes, clothing and homeware | Make reuse realistic, not just decorative |
Maximising Shelf Appeal with Unique Box Shapes
An unusual box shape can interrupt the uniformity of a shelf, but it must still work in merchandising, packing and storage. A memorable silhouette is useful when it reinforces what the product is: an angular carton may suit a technical item, while a soft-edged presentation box can support a more considered gifting proposition.
1. Tapered or shaped cartons
Tapered cartons, hexagonal boxes and curved-edge formats can add distinction without relying on heavy graphics. They are particularly useful for lightweight products, giftable goods and items that benefit from a more ceremonial reveal.
Before choosing a non-standard shape, check:
- Whether the box stands securely on its base.
- How it will sit alongside other packs on a shelf.
- Whether labels, barcodes and mandatory product information have a flat, legible location.
- How efficiently the finished boxes can be stored before packing.
- Whether the structure gives adequate protection around corners and edges.
A dramatic shape is not automatically a better shape. If the product is often stacked, displayed in rows or packed in larger outer cartons, a simple rectangular base with one distinctive structural element can be the more practical choice.
2. Handle-top and carry-friendly boxes
A die-cut handle turns a standard paper box into packaging that feels more like a gift. This works well for curated sets, bakery-style presentation, event packs and smaller retail purchases.
The handle should be proportionate to the product weight and positioned to keep the contents level. Test a physical sample with the actual packed product, not an empty box. A handle that looks elegant in artwork can become awkward if the box tilts, tears or catches on nearby packaging.
For product lines that need a more conventional outer profile, consider a removable sleeve around a handled inner box. The sleeve creates a clean area for brand information while the inner pack adds the gift-like experience.
3. Reusable rigid-style presentation formats
A box that customers may keep can extend the life of the brand presentation. Lid-and-base boxes, drawer boxes and magnetic-style closure formats are common choices for products such as accessories, apparel, stationery and gift collections.
Reuse is most credible when the format has a practical second purpose. A drawer box can hold small items; a sturdy lidded box can organise accessories. Avoid adding complex components solely to imply luxury, particularly if they reduce recyclability or make the pack harder to separate after use.
Explore custom paper box formats when comparing structural styles against your product dimensions and display requirements.
Incorporating Texture and Finishes (Matte/Gloss)
Texture affects how packaging is perceived and handled. Matte, gloss and tactile finishes can guide attention, create contrast and help customers recognise different product tiers. They should support the artwork rather than compensate for weak design.
4. Matte finishes for calm, premium presentation
Matte surfaces reduce glare and can make typography, line drawings and restrained colour palettes feel more deliberate. They are often a good fit for products positioned around simplicity, craft, wellbeing or understated gifting.
However, dark matte areas can be susceptible to visible marks during handling. Consider where the pack will be touched most often, how it will be packed and whether a lighter colour or a patterned design would make handling marks less noticeable.
5. Gloss highlights for focal detail
Gloss can make colour appear more intense and can draw attention to a logo, pattern or product name. Instead of applying gloss to the whole carton, use it as a contrast against a matte background. This gives the eye a clear focal point and can make key details easier to find.
Other tactile approaches include embossed lettering, debossed patterns and textured paper stocks. Each adds production complexity, so ask whether the effect will still be visible in the intended retail lighting and whether fine details remain legible.
A useful rule is to choose one primary finish and one supporting effect. Combining several special finishes can make a box feel busy and may distract from essential product information.
Die-Cutting and Window Patches: A Closer Look
Die-cut features make a paper box more interactive and can reveal the product without opening the package. They are especially useful when the product’s colour, texture, shape or finish is an important part of the purchase decision.
6. Die-cut windows that show the right detail
A window can take the form of a simple rectangle, a branded shape or a narrow strip. The most successful window reveals one appealing, identifiable part of the product rather than exposing everything.
For example, a window may show:
- The colour of a candle vessel or cosmetic container.
- The texture of a textile accessory.
- The design of a stationery set.
- A carefully arranged group of items in a gift pack.
Window placement matters. Keep sufficient board around the cut-out to maintain box strength, especially near folds, corners and carrying points. Also consider whether the product will move inside the pack and become misaligned with the window.
7. Cut-out patterns and layered reveals
A die-cut need not be a window. Repeated cut-out patterns, peek-through tabs and layered outer sleeves can create depth without exposing the product directly. A sleeve with a partial cut-out, for instance, can frame an inner tray or coloured box beneath it.
This is a practical way to introduce visual interest to a standard structure. It may be preferable to an elaborate box shape where packing speed, shelf stacking or storage space is a priority.
If a patch material, adhesive, coating or mixed component is being considered, review the end-of-life implications for the intended market. Recycling guidance and material acceptance can vary, so confirm the current requirements that apply to your packaging and product category.
Cost-Effective Custom Packaging Strategies
Creative packaging does not require every box to be structurally complex. The most cost-effective approach is usually to keep the core structure efficient and concentrate creativity where customers will see or feel it.
Design around a standard footprint
A standard rectangular carton or mailer-style format can be customised effectively through artwork, a sleeve, an insert, a label area or a well-planned opening sequence. This may reduce unnecessary board use and make internal packing more straightforward.
Where a range includes several product sizes, consider a family of formats rather than a separate design for every SKU. Shared widths, common closure styles and adaptable inserts can help create visual consistency while reducing avoidable variation.
Use print design strategically
Rather than covering every surface with detail, focus on high-impact areas:
- The front panel for immediate recognition.
- The opening panel for a brief brand message or instruction.
- The interior for a surprise colour, pattern or thank-you note.
- The side panels for variants, ingredients, care details or product information.
Designing the inside of the box can feel premium without requiring a wholly new exterior structure. Ensure interior printing does not make instructions, recycling information or other required content harder to locate.
Avoid false economies
The cheapest-looking specification is not always the lowest-cost solution overall. A box that is difficult to assemble, poorly sized for the product or prone to requiring excessive void fill can create avoidable handling issues.
Request a production-ready dieline and check it against the real product before approving artwork. Confirm board choice, finishing method, dimensions, closure, packing method and the treatment of variable product details. For a new range, a physical prototype is often more informative than a screen proof.
The Role of Colour Psychology in Box Design
Colour is a quick way to signal product category, mood and position within a range. There is no universal meaning for a colour, though: context, surrounding colours, typography and audience expectations all influence interpretation.
8. Build a colour system, not just a colour scheme
A strong paper box design normally has a hierarchy:
- Brand colour for recognition across the range.
- Product or variant colour for navigation.
- Neutral space for legibility and visual rest.
- Accent colour for calls to action, flavours or limited editions.
This system is particularly useful where several products are displayed together. Customers should be able to recognise the master brand first, then distinguish the product type or variant second.
Muted tones may support an understated, natural or premium direction, while saturated colours can make a product feel energetic and immediate. Neither approach is inherently better. Choose colours that work with the product itself and the likely retail environment.
Check colour in real conditions
Artwork viewed on a bright screen is not a reliable representation of a finished paper box. Check printed samples under typical indoor lighting, alongside neighbouring packaging and with any labels or inserts in place.
Pay special attention to:
- Contrast between text and background.
- Fine type reversed out of dark colours.
- Consistency across different board surfaces.
- Whether metallic, gloss or textured areas alter the perceived shade.
- How colour supports, rather than obscures, necessary information.
Do not rely on colour alone to identify variants where clarity is important. Pair it with plain-language names, icons or other clear visual markers.
Designing the Perfect Box Interior (Inserts)
The interior is where product protection and presentation meet. A well-designed insert holds the item in the correct position, controls movement and creates a deliberate reveal when the box is opened.
9. Product-fitting inserts
Paperboard inserts, folded card platforms and compartment dividers are adaptable options for many products. They can support bottles, jars, electronics, accessories, small parts and gift sets, provided the structure is designed around the actual item.
Measure more than the product’s widest point. Account for caps, handles, protective wraps, irregular edges and any components that may shift. A tight fit can make an item difficult to remove, while a loose fit can undermine both protection and presentation.
For multi-item gift sets, use dividers to establish a logical order. Place the hero product where it is seen first, then arrange supporting items so they do not collide during handling.
Insert choices to compare
| Insert approach | Presentation effect | Practical advantage | Watch out for |
|---|---|---|---|
| Folded paperboard insert | Clean, structured | Can be printed and shaped to the product | Requires accurate folds and tolerances |
| Divider grid | Organised multi-item set | Keeps components separate | May use more material than a simple platform |
| Raised platform | Creates a premium reveal | Lifts the product into view | Needs secure support underneath |
| Tissue or paper wrap | Soft, gift-like opening | Flexible for varied shapes | Offers limited positional control alone |
| Moulded fibre insert | Natural, protective appearance | Useful for some shaped products | Surface finish and fit need checking |
The best option depends on the product’s vulnerability, desired opening sequence and packing process. Where sustainability is a priority, assess the full pack rather than assuming one material choice resolves every consideration. Material separation, inks, coatings, adhesives and local collection systems should all be checked.
Unboxing Experience: Making Your Gift Packaging Memorable
A memorable unboxing experience comes from clarity and pacing, not excessive layers. The customer should know how to open the box, find the product easily and feel that the presentation reflects the value of the item.
10. Create a simple reveal sequence
A good gift box can guide the opening in three steps:
- Recognition: the outer box clearly identifies the brand or occasion.
- Anticipation: a sleeve, seal, fold or interior message provides a small pause.
- Reveal: the product is presented neatly, securely and without unnecessary filler.
Interior print, a contrasting tray colour or a concise message under the lid can add a considered touch. Keep copy purposeful: usage guidance, a short care instruction or a relevant product detail is often more valuable than generic marketing language.
Make gift packaging practical as well as attractive
Gift packaging should be easy for the purchaser to carry, wrap if desired and open without damaging the contents. Consider whether a tamper feature is necessary for the product category, and ensure it does not create confusion for the recipient.
Avoid common unboxing mistakes:
- Closures that are hard to locate or open.
- Too many layers for a small or simple item.
- Inserts that make removal awkward.
- Loose accessories that move around the box.
- Large empty spaces that make the presentation feel under-filled.
- Decorative elements that prevent the package from closing properly.
For occasions and curated sets, gift packaging options can help you compare drawer, lid-and-base and sleeve-led presentations.
Ways to evaluate creative paper box design
The strongest creative packaging ideas balance visual impact with practical performance. Use a structured review before proceeding to final artwork or production.
A practical evaluation checklist
Ask the following questions:
- Product fit: Does the box accommodate the actual product and any protective components?
- Shelf clarity: Can a customer identify the brand, product type and key variant quickly?
- Opening: Is it obvious how to open, remove and, where relevant, reclose the box?
- Protection: Does the structure control movement and protect vulnerable areas?
- Handling: Is the pack practical for staff to assemble, fill, stack and display?
- Information: Is there enough clear space for required product content and labelling?
- Finish: Does the chosen coating or texture suit likely handling conditions?
- Material choices: Can components be separated where necessary, and have end-of-life requirements been checked?
- Range consistency: Does the design work across different sizes, colours or product variants?
- Budget fit: Are the creative elements focused on the details that customers will actually notice?
Review physical samples, not artwork alone
A digital visual can show colour and layout, but it cannot fully show fold accuracy, board feel, closure performance or the way a product sits in an insert. Review samples with the real product, including any leaflets, labels, seals and protective wrapping.
It is also sensible to see the pack in its intended setting: on a shelf, in a display tray, in a gift bag or as part of an e-commerce order. This reveals issues such as hidden branding, awkward opening directions and oversized empty areas early.
Choosing the right idea for your product
For everyday retail products, a clear colour system, efficient structure and selective finish are often the most effective combination. For gifts and premium ranges, a shaped outer box, layered reveal and fitted insert may be more suitable. For products where appearance is central to purchase, a carefully positioned window can do more work than extra print.
XGolden Print has 27 years of experience in custom packaging and printing, with a 15,000 square metre factory, 500+ employees and 10M+ production capacity. When you are ready to turn an idea into a specification, review the available custom packaging box options and prepare product dimensions, pack contents, artwork requirements and the features you want to test.
